Using Excel's AutoFilter Feature
The Excel spreadsheet you receive from Safari contains information
about all students enrolled in courses in your department. However, you
may want to only view a select number of rows ("records") at
once. To accomplish this task you can use what is known as "filtering”.
Filtering a spreadsheet allows you to display only selected information;
with a filter you can specify which rows you’d like to see, and
hide the other records. The data you don’t select isn’t changed
or deleted, it’s just hidden and can be retrieved at any time.
Enabling AutoFilters
Using AutoFilters on Columns
Applying Multiple Filters
Defining Custom Filters
Filtering Unique Records
Troubleshooting
Enabling AutoFilters
When you enable AutoFiltering, Excel turns columns into
pull-down menus with which you can select certain tows of data. To enable
AutoFiltering, click on any single cell and then from the menu select
Data, Filter,
and AutoFilter.

Using AutoFilters on Columns
Once AutoFiltering is enabled you can click on the down
arrow and select a value for that column: this will display only the rows
that contain the specified value.

The down arrow turns blue to indicate that the column is being filtered.

To return to the full list of rows, click the down-arrow and select All.
Once you have selected certain records from your data set
with a filter you can continue applying filters to further limit the records
you wish to view. As we noted above, the pull-down arrow of a filtered
row turns blue to indicate a column is being filtered. You can continue
using other pull-down arrows to select from the current selection, and
apply as many filters as you like.
Defining Custom Filters
Excel also allows you to define you own filters. This can
be extremely useful if you want to select items by certain attributes,
such as containing a specific string of characters.
To define your own AutoFilter, Click the down arrow and
select Custom….

Then define your query by choosing a quantifier (such as
equals or contains) from the left side, and choosing a field or typing
into the box to the right of the quantifier. Note that you can use a question
mark (?) to represent any single character and an asterisk (*) to represent
any series of characters.

For example, let’s say you want to select from a
department listing all students who have Chemistry as one of their majors.
First you’d click the pull-down arrow in the column that contains
the majors. (X_STU_CURRENT_PROGRAMX_STU_CURRENT_PROGRAM). Then you’d
select Custom… from the pull-down list. On the
left side of the custom box you’d choose contains, and on the right-side
you’d type the value CHEM. This would display all
students that have Chemistry as one of their majors.
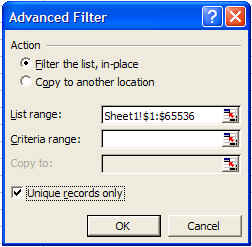
Filtering Unique Records
Oftentimes a data set will contain multiple copies of the
same record, which can make your data set harder to work with than is
necessary. To avoid this problem, you can filter the data to only display
only unique records:
First, select all records. This can be easily be done by
simultaneously pressing CTRL and A.
Then, select Data, Filter, and
then Advanced Filter...

In the Advanced Filters pop-up, check the Unique
Records box, and then click OK. If you get a
"Reference Not Valid" error, chances are you didn't correctly
select all records.
Troubleshooting
If you get stuck or confused, you can always turn off AutoFilters
from the Data, Filters
menu, and the full data set will reappear.
More advanced filtering techniques are possible. For help
with AutoFilters or information on Advanced Filters, contact the Help Desk (x2526).
|